SmartAdmin
Responsive WebApp
- created: 01/19/2014
- latest update: 03/01/2014
- by: MyOrange
- email: support@myorange.ca
Thank you for purchasing SmartAdmin Responsive WebApp. If you have any questions that are beyond the scope of this help file, please feel free to email me via the email address above.
Introduction
SmartAdmin WebApp - goes beyond the ordinary admin template. Its unique flat design and responsive layout is crafted one of a kind. SmartAdmin comes with 40+ customized jquery plugins including 5 unique plugins (exclusively catered for SmartAdmin). SmartAdmin Layout API lets you customize your project for almost any device - be it Mobile, Web or WebApp - SmartAdmin has you covered!
SmartAdmin is exclusively sold at wrapbootstrap.com; please make sure you save your license ID for support and future upgrades.
To re-download updates - please register/login to wrapbootstrap.com and go to attach orders page for the free download link. If you are having problems with the re-download, please contact wrapbootstrap support
Bootstrap ua (Ukrainian)

https://wrapbootstrap.com/support/download-resender

Unpacking
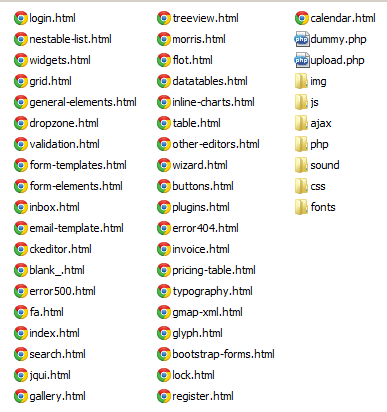
Once you have successfully downloaded SmartAdmin from Wrapbootstrap.com, you will notice right away that the zip folder contains the following:

Click the Developer folder and you will arrive to the choices below:

Both, AJAX and the HTML (NON-AJAX ) version for Smartadmin, looks and functions the same. However, the behaviour of the way how the navigation works and how the Scripts are loaded are different.
Select the appropriate version for your project to begin. If you are an ASP.NET user, it is best suited to go with the HTML_version (NON-AJAX)
AJAX VERSION
File Structure
If you decided to go with AJAX version, you will need to host your site to a server to preview any of your pages. SmartAdmin AJAX_version works differently than the pure HTML or the HTML_version. For starters, the navigation system relies on #hashtag in URL's to load the AJAX pages, aditional scripts related to the page is also loaded via ajax.
You will see the following file strucutre for the AJAX version

Open "ajax" folder and you will notice all the pages here have no styles or direct links to plugins. In fact if you try to open any of the pages in your browser they will not display properly. These are AJAX pages, these pages gets pulled in via the app.js and renders inside #content div of index.html.
To explain deeper on how these pages work, lets open blank_.html file with any of your favorite HTML editors:
<!-- Bread crumb is created dynamically -->
<!-- row -->
<div class="row">
<!-- col -->
<div class="col-xs-12 col-sm-7 col-md-7 col-lg-4">
<h1 class="page-title txt-color-blueDark"><!-- PAGE HEADER -->
Page Header <span>> Subtitle</span></h1>
</div><!-- end col -->
<!-- right side of the page with the sparkline graphs -->
<!-- col -->
<div class="col-xs-12 col-sm-5 col-md-5 col-lg-8">
<!-- sparks -->
<ul id="sparks">
[SPARKLINE]
</ul><!-- end sparks -->
</div><!-- end col -->
</div><!-- end row -->
<!-- widget grid -->
<section class="" id="widget-grid">
<!-- row -->
<div class="row">
<!-- NEW WIDGET START -->
<article class="col-xs-12 col-sm-12 col-md-12 col-lg-12">
[WIDGET]
</article><!-- WIDGET END -->
</div><!-- end row -->
<!-- row -->
<div class="row">
<!-- a blank row to get started -->
<div class="col-sm-12">
<!-- your contents here -->
</div>
</div><!-- end row -->
</section><!-- end widget grid -->
<script type="text/javascript">
/* DO NOT REMOVE : GLOBAL FUNCTIONS!
*
* pageSetUp(); WILL CALL THE FOLLOWING FUNCTIONS
*
* // activate tooltips
* $("[rel=tooltip]").tooltip();
*
* // activate popovers
* $("[rel=popover]").popover();
*
* // activate popovers with hover states
* $("[rel=popover-hover]").popover({ trigger: "hover" });
*
* // activate inline charts
* runAllCharts();
*
* // setup widgets
* setup_widgets_desktop();
*
* //setup nav height (dynamic)
* nav_page_height();
*
* // run form elements
* runAllForms();
*
********************************
*
* pageSetUp() is needed whenever you load a page.
* It initializes and checks for all basic elements of the page
* and makes rendering easier.
*
*/
pageSetUp();
/*
* ALL PAGE RELATED SCRIPTS CAN GO BELOW HERE
* eg alert("my home function");
*/
</script>
Ajax Nav
app.js will make a call using the ajax function and load these pages to the <div id="container">. To view how this would work, we look at the SmartAdmin main navigation link structure:
The hash tag is added automatically for all main nav links
<ul>
    <li class=""><a href="ajax/dashboard.html" title=
    "Dashboard"><span class="menu-item-parent">Dashboard</span></a></li>
    <li><a href="ajax/inbox.html"><span class="menu-item-parent">Inbox</span><span class="badge pull-right inbox-badge">14</span></a></li>
    <li>
        <a href="#"><span class="menu-item-parent">Graphs</span></a>
        <ul>
            <li><a href="ajax/flot.html">Flot Chart</a></li>
            <li><a href="ajax/morris.html">Morris Charts</a></li>
            <li><a href="ajax/inline-charts.html">Inline Charts</a></li>
        </ul>
    </li>
</ul>
The function in app.js will sort this out with the following function:
$(document).on('click', 'nav a[href!="#"]', function(e) {
    e.preventDefault();
    $this = $(e.currentTarget);

    // if parent is not active then get hash, or else page is assumed to be loaded
    if (!$this.parent().hasClass("active") && !$this.attr('target')) {

        // update window with hash
        // you could also do here:  $.device === "mobile" - and save a little more memory
        if ($.root_.hasClass('mobile-view-activated')) {
            $.root_.removeClass('hidden-menu');
            window.setTimeout(function() {
                window.location.hash = $this.attr('href')
            }, 150); // it may not need this delay...
        } else {
            window.location.hash = $this.attr('href');
        }
    }
});
function checkURL() {

    //get the url by removing the hash
    url = location.hash.replace(/^#/, '');
    container = $('#content');

    // Do this if url exists (for page refresh, etc...)
    if (url) {

        // remove all active class
        $('nav li.active').removeClass("active");

        // match the url and add the active class
        $('nav li:has(a[href="' + url + '"])').addClass("active");

        title = ($('nav a[href="' + url + '"]').attr('title'))

        // change page title from global var
        document.title = (title || document.title);

        //console.log("page title: " + document.title);
        // parse url to jquery
        loadURL(url, container);

    } else {

        // grab the first URL from nav
        $this = $('nav > ul > li:first-child > a[href!="#"]');

        //update hash
        window.location.hash = $this.attr('href');
    }
}
The loadURL function works as following:
function loadURL(url, container) {

    $.ajax({
        type: "GET",
        url: url,
        dataType: 'html',
        cache: true,
        beforeSend: function() {
            // cog placed
            container.html('<h1><i class="fa fa-cog fa-spin"></i> Loading...</h1>');
            // only draw breadcrumb if it is content material
            // TODO: check if document title injection refreshes in IE...
            // TODO: see the framerate for the animation in touch devices
            if (container[0] == $("#content")[0]) {
                drawBreadCrumb();
                // update title with breadcrumb...
                document.title = $(".breadcrumb li:last-child").text();

                // scroll up
                $("html, body").animate({
                    scrollTop: 0
                }, "fast");

            } else {
                container.animate({
                    scrollTop: 0
                }, "fast");
            }
        },
        success: function(data) {
            // cog replaced here...
            // alert("success")

            container.css({
                opacity: '0.0'
            }).html(data).delay(50).animate({
                opacity: '1.0'
            }, 300);
        },

        error: function(xhr, ajaxOptions, thrownError) {

            container.html('<h4 style="margin-top:10px; display:block; text-align:left"><i class="fa fa-warning txt-color-orangeDark"></i> Error 404! Page not found.</h4>');
        },
        async: false
    });

}
// fire links with targets on different window

$(document).on('click', 'nav a[target="_blank"]', function(e) {
    e.preventDefault();
    $this = $(e.currentTarget);
    window.open($this.attr('href'));
});

// fire links with targets on same window
$(document).on('click', 'nav a[target="_top"]', function(e) {
    e.preventDefault();
    $this = $(e.currentTarget);
    window.location = ($this.attr('href'));
});

// all links with hash tags are ignored
$(document).on('click', 'nav a[href="#"]', function(e) {
    e.preventDefault();

});
// fire links with targets on different window
$(document).on('click', 'nav a[target="_blank"]', function(e) {
    e.preventDefault();
    $this = $(e.currentTarget);
    window.open($this.attr('href'));
});

// fire links with targets on same window
$(document).on('click', 'nav a[target="_top"]', function(e) {
    e.preventDefault();
    $this = $(e.currentTarget);
    window.location = ($this.attr('href'));
});
You can also load pages within the content by adding a hashtag in front of the URL for example
<a href="#ajax/mypage.php"> load my page </a> // this will load the following content into the main container.
Loading Scripts via AJAX
SmartAdmin AJAX loads scripts dynamically and uses a lazy load method. The following function handles the AJAX load method call:
loadScript("js/my_lovely_script.js", loadCompleteFunction);
You can use this method to concatinate a chain of scripts such as:
loadScript("js/script1.js", loadScript_2);

function loadScript_2() {
    loadScript("js/script2.js", loadApp);
}

function loadApp() {
    loadScript("js/myapp.js", runApp);
}
The loadScript() function works as follows:
var jsArray = {}; // keeps track of all loaded scripts

function loadScript(scriptName, callback) {
    if (!jsArray[scriptName]) {
        jsArray[scriptName] = true;
        // adding the script tag to the head as suggested before
        var body = document.getElementsByTagName('body')[0];
        var script = document.createElement('script');
        script.type = 'text/javascript';
        script.src = scriptName;

        // then bind the event to the callback function
        // there are several events for cross browser compatibility
        //script.onreadystatechange = callback;

        script.onload = callback;
        // fire the loading
        body.appendChild(script);

    } else if (callback) { // changed else to else if(callback)
        //console.log("JS file already added!");
        //execute function
        callback();
    }
}
Ajax post
<form action="#ajax/search.html">
   <input type="text" name="param" id="search-fld">
   <button type="submit">
     <i class="fa fa-search"></i>
   </button>
</form>
This will result the an URL key as follows:
smartadmin/?param=my_search_text#ajax/search.html
This can later be extrated for form operations
Ajax page setup (scripts in the bottom)
< script type = "text/javascript" >
    /* DO NOT REMOVE : GLOBAL FUNCTIONS!
     *
     * pageSetUp(); WILL CALL THE FOLLOWING FUNCTIONS
     *
     * // activate tooltips
     * $("[rel=tooltip]").tooltip();
     *
     * // activate popovers
     * $("[rel=popover]").popover();
     *
     * // activate popovers with hover states
     * $("[rel=popover-hover]").popover({ trigger: "hover" });
     *
     * // activate inline charts
     * runAllCharts();
     *
     * // setup widgets
     * setup_widgets_desktop();
     *
     * //setup nav height (dynamic)
     * nav_page_height();
     *
     * // run form elements
     * runAllForms();
     *
     ********************************
     *
     * pageSetUp() is needed whenever you load a page.
     * It initializes and checks for all basic elements of the page
     * and makes rendering easier.
     *
     */
    pageSetUp();
    /*
     * ALL PAGE RELATED SCRIPTS CAN GO BELOW HERE
     * eg alert("my home function");
     */
< /script>
HTML (non-AJAX) VERSION
You will see the following file structure for the NON-AJAX (HTML version)
The non-Ajax version of SmartAdmin is pretty straight forward. Just treat it like a regular HTML template and you will see how easy it is to implement.
The navigation for non-AJAX version is different to that of AJAX version. We turned off the ajax call method by opening app.js and switching $.navAsAjax to false.
Though the HTML_version is mostly HTML, the Inbox and notification messages still uses the AJAX call method.
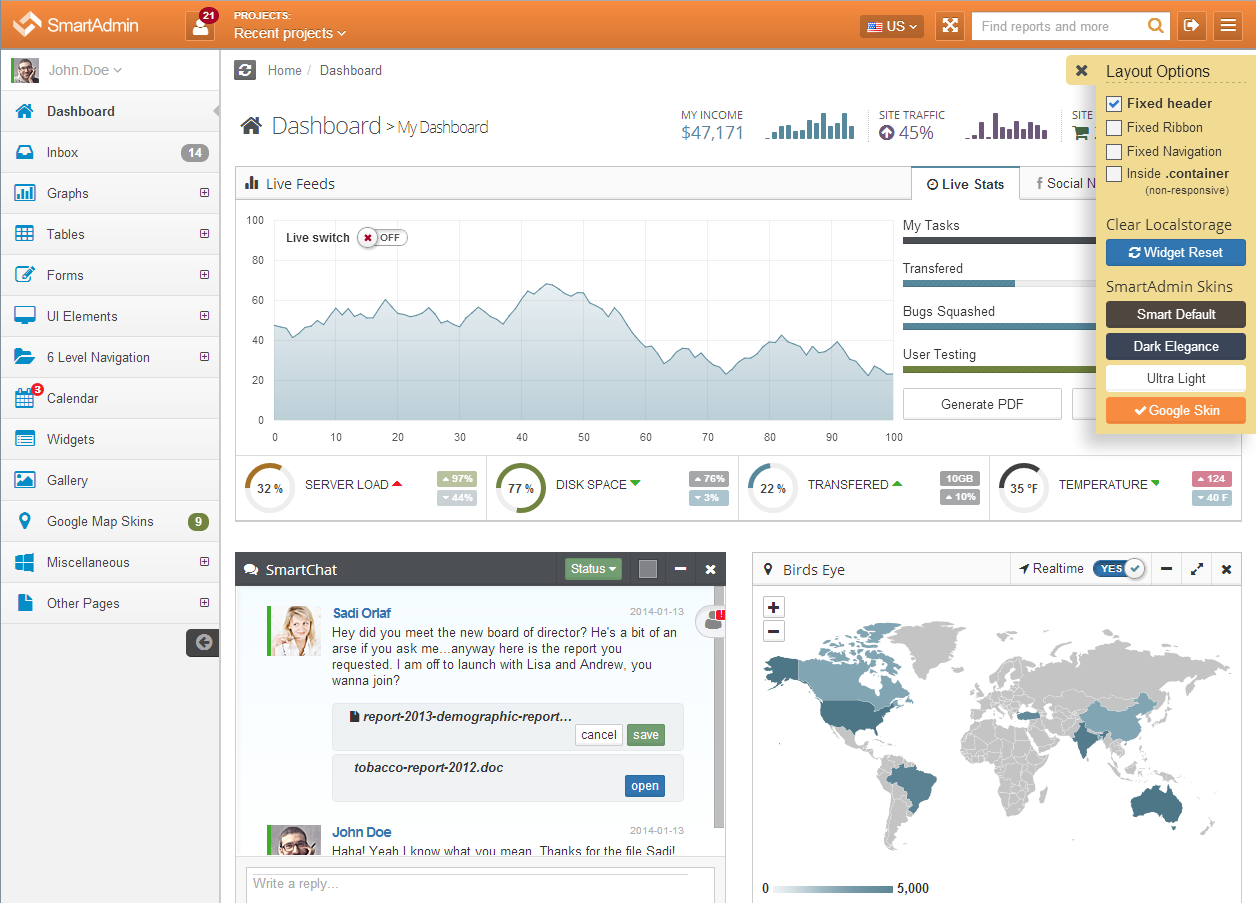
Layout API
Minified
Minifies the navigation so users can have more room for the body while still having access to the menu by hovering over parent node icons

Hidden Menu

Fixed Header

Fixed Header

Fixed Navigation, Header and Ribbon (composite API)

Fixed Navigation, Header and Ribbon (composite API)

Remove your demo.js
It is a good idea to remove your demo.js file once you have a basic configuration set for your users, unless you want your users to have full control of the layout, it is generally recommended to remove the demo.js file
Page Structure
Full Page Structure (AJAX & HTML)
<!DOCTYPE html>
<html lang="en-us">

    <head>
        [HEAD_INFO]
    </head>

    <body class="">

        <header id="header">
                [#LOGO]
                [AJAX_DROPDOWN]
                [PROJECTS_DROPDOWN]
                [ICONS_AND_SEARCH]
        </header>

        <aside id="left-panel">
           [USER_INFO]
            <nav>
                <ul>
                    <li class="">[NAV_LINKS]</li>
                    <li class="">[NAV_LINKS]</li>
                </ul>
            </nav>
        </aside>

        <!-- MAIN PANEL -->
        <div id="main">
            <!-- RIBBON -->
            <div id="ribbon">
                [BREAD_CRUMB]
            </div>
            <div id="content">
                [PAGE_CONTENTS]
            </div>
        </div>

        <div id="shortcut">
            [METRO_SHORTCUT]
        </div>

        [ALL_PAGE_SCRIPTS]
    </body>
</html>
HEAD_INFO
<head>
    <meta charset="utf-8">
    <!--<meta http-equiv="X-UA-Compatible" content="IE=edge,chrome=1">-->

    <title>SmartAdmin</title>
    <meta content="" name="description">
    <meta content="" name="author">
    <meta content=
    "width=device-width, initial-scale=1.0, maximum-scale=1.0, user-scalable=no"
    name="viewport"><!-- Basic Styles -->
    <link href="css/bootstrap.min.css" media="screen" rel="stylesheet" type=
    "text/css">
    <link href="css/font-awesome.min.css" media="screen" rel="stylesheet" type=
    "text/css">
    <!-- SmartAdmin Styles : Please note (smartadmin-production.css) was created using LESS variables -->
    <link href="css/smartadmin-production.css" media="screen" rel="stylesheet"
    type="text/css">
    <link href="css/smartadmin-skins.css" media="screen" rel="stylesheet" type=
    "text/css">
    <!-- Demo purpose only: goes with demo.js, you can delete this css when designing your own WebApp -->
    <link href="css/demo.css" media="screen" rel="stylesheet" type="text/css">
    <!-- FAVICONS -->
    <link href="img/favicon/favicon.ico" rel="shortcut icon" type=
    "image/x-icon">
    <link href="img/favicon/favicon.ico" rel="icon" type="image/x-icon">
    <!-- GOOGLE FONT -->
    <link href=
    "http://fonts.googleapis.com/css?family=Open+Sans:400italic,700italic,300,400,700"
    rel="stylesheet"><!-- Specifying a Webpage Icon for Web Clip
         Ref: https://developer.apple.com/library/ios/documentation/AppleApplications/Reference/SafariWebContent/ConfiguringWebApplications/ConfiguringWebApplications.html -->
    <link href="img/splash/sptouch-icon-iphone.png" rel="apple-touch-icon">
    <link href="img/splash/touch-icon-ipad.png" rel="apple-touch-icon" sizes=
    "76x76">
    <link href="img/splash/touch-icon-iphone-retina.png" rel="apple-touch-icon"
    sizes="120x120">
    <link href="img/splash/touch-icon-ipad-retina.png" rel="apple-touch-icon"
    sizes="152x152">
    <!-- iOS web-app metas : hides Safari UI Components and Changes Status Bar Appearance -->
    <meta content="yes" name="apple-mobile-web-app-capable">
    <meta content="black" name="apple-mobile-web-app-status-bar-style">
    <!-- Startup image for web apps -->
    <link href="img/splash/ipad-landscape.png" media=
    "screen and (min-device-width: 481px) and (max-device-width: 1024px) and (orientation:landscape)"
    rel="apple-touch-startup-image">
    <link href="img/splash/ipad-portrait.png" media=
    "screen and (min-device-width: 481px) and (max-device-width: 1024px) and (orientation:portrait)"
    rel="apple-touch-startup-image">
    <link href="img/splash/iphone.png" media=
    "screen and (max-device-width: 320px)" rel="apple-touch-startup-image">
</head>
HEADER
<header id="header">
    <div id="logo-group">
        <!-- PLACE YOUR LOGO HERE -->
         <span id="logo"><img alt="SmartAdmin" src="img/logo.png"></span>
        <!-- END LOGO PLACEHOLDER -->

         <span class="activity-dropdown" id="activity"> <b class="badge">21</b></span>

        <!-- AJAX-DROPDOWN : control this dropdown height, look and feel from the LESS variable file -->

        <div class="ajax-dropdown">
            [JUSTIFIED_BUTTONS]

            <div class="ajax-notifications custom-scroll">
               [DROPDOWN_CONTENT]
            </div><!-- end notification content -->

            <!-- footer: refresh area -->
             <span>Last updated on: 12/12/2013 9:43AM</span>
            <!-- end footer -->
        </div><!-- END AJAX-DROPDOWN -->

    </div><!-- projects dropdown -->

    <div id="project-context">
        <span class="label">Projects:</span> <span class=

        "popover-trigger-element dropdown-toggle" data-toggle="dropdown"

        id="project-selector">Recent projects</span>

        <!-- Suggestion: populate this list with fetch and push technique -->
        <ul class="dropdown-menu">
            <li>...</li>
        </ul><!-- end dropdown-menu-->

    </div><!-- end projects dropdown -->
    <!-- pulled right: nav area -->


    <div class="pull-right">
        <!-- collapse menu button -->

        <div class="btn-header pull-right" id="hide-menu">
            <span><a href="javascript:void(0);" title=Collapse Menu"></a></span>
        </div><!-- end collapse menu -->

        <!-- logout button -->

        <div class="btn-header transparent pull-right" id="logout">
            <span><a data-logout-msg="You can improve your security further after logging out by closing this opened browser" href="login.html" title="Sign Out"></a></span>
        </div><!-- end logout button -->

        <!-- search mobile button (this is hidden till mobile view port) -->
        <div class="btn-header transparent pull-right" id="search-mobile">
            <span><a href="javascript:void(0)" title="Search"></a></span>
        </div><!-- end search mobile button -->

        <!-- input: search field -->
        <form action="#ajax/search.html" class="header-search pull-right">
            <input id="search-fld" name="param" placeholder="Find reports and more" type="text"> <a href="javascript:void(0);" id="cancel-search-js" title="Cancel Search"></a>

        </form><!-- end input: search field -->

        <!-- fullscreen button -->
        <div class="btn-header transparent pull-right" id="fullscreen">
            <span><a href="javascript:void(0);" onclick="launchFullscreen(document.documentElement);" title="Full Screen"></a></span>
        </div><!-- end fullscreen button -->

        <!-- multiple lang dropdown : find all flags in the image folder -->
        <ul class="header-dropdown-list hidden-xs">
            <li>...</li>
        </ul><!-- end multiple lang -->

    </div><!-- end pulled right: nav area -->
</header><!-- END HEADER -->
ASIDE (NAV)
<aside id="left-panel">
    <!-- User info -->
    <div class="login-info">
        <span>
        <!-- User image size is adjusted inside CSS, it should stay as it -->
         <a href="javascript:void(0);" id="show-shortcut"><img alt="me"
        class="online" src="img/avatars/sunny.png">
        <span>john.doe</span></a></span>
    </div>
    <!-- end user info -->

    <nav>
        <ul>
            <li class=""><a href="ajax/dashboard.html" title=
            "Dashboard"><span class=
            "menu-item-parent">Dashboard</span></a></li>
            <li>...</li>
            <li>
                <a href="#"><span class=
                "menu-item-parent">Graphs</span></a>
                <ul>
                    <li><a href="ajax/flot.html">...</a></li>
                    <li>...</li>
                    <li>...</li>
                </ul>
            </li>
        </ul>
    </nav>
</aside>
MAIN_PANEL
<div id="main">

    <!-- RIBBON -->
    <div id="ribbon">
        <span class="ribbon-button-alignment btn btn-ribbon" data-html="true" data-original-title="message..." data-placement="bottom" data-title="refresh" id="refresh"></span>
        <!-- breadcrumb -->
        <ol class="breadcrumb">
            <!-- if you are using the AJAX version, the breadcrumb area will be empty -->
            <li>Blank Page</li>
        </ol><!-- end breadcrumb -->

    </div><!-- END RIBBON -->
    <!-- MAIN CONTENT -->

    <div id="content"> [YOUR_CONTENT_HERE] </div><!-- END MAIN CONTENT -->

</div><!-- END MAIN PANEL -->
Default Page Scripts
WARNING: If you plan to move any of the javascript files to the page header, SmartAdmin may not function properly
<!-- END SHORTCUT AREA -->

<!--================================================== -->
<!-- PACE LOADER - turn this on if you want ajax loading to show (caution: uses lots of memory on iDevices)
        <script data-pace-options='{ "restartOnRequestAfter": true }' src="js/plugin/pace/pace.min.js"></script>-->
<!-- Link to Google CDN's jQuery + jQueryUI; fall back to local -->
<!DOCTYPE html PUBLIC "-//W3C//DTD HTML 4.01//EN">
<script src="//ajax.googleapis.com/ajax/libs/jquery/2.0.2/jquery.min.js"></script>
<script>
    if (!window.jQuery) {

            document.write('<script src="js/libs/jquery-2.0.2.min.js"></script>');

        }
</script>
<script src=
"//ajax.googleapis.com/ajax/libs/jqueryui/1.10.3/jquery-ui.min.js"></script>
<script>
    if (!window.jQuery.ui) {
            document.write('<script src="js/libs/jquery-ui-1.10.3.min.js"></script>');
        }
</script>
<!-- JS TOUCH : include this plugin for mobile drag / drop touch events
    <script src="js/plugin/jquery-touch/jquery.ui.touch-punch.min.js"></script> -->

<!-- BOOTSTRAP JS -->
<script src="js/bootstrap/bootstrap.min.js"></script>

<!-- CUSTOM NOTIFICATION -->
<script src="js/notification/SmartNotification.min.js"></script>

<!-- JARVIS WIDGETS -->
<script src="js/smartwidgets/jarvis.widget.min.js"></script>

<!-- EASY PIE CHARTS -->
<script src="js/plugin/easy-pie-chart/jquery.easy-pie-chart.min.js"></script>

<!-- SPARKLINES -->
<script src="js/plugin/sparkline/jquery.sparkline.min.js"></script>

<!-- JQUERY VALIDATE -->
<script src="js/plugin/jquery-validate/jquery.validate.min.js"></script>

<!-- JQUERY MASKED INPUT -->
<script src="js/plugin/masked-input/jquery.maskedinput.min.js"></script>

<!-- JQUERY SELECT2 INPUT -->
<script src="js/plugin/select2/select2.min.js"></script>

<!-- JQUERY UI + Bootstrap Slider -->
<script src="js/plugin/bootstrap-slider/bootstrap-slider.min.js"></script>

<!-- browser msie issue fix -->
<script src="js/plugin/msie-fix/jquery.mb.browser.min.js"></script>

<!-- FastClick: For mobile devices: you can disable this in app.js -->
<script src="js/plugin/fastclick/fastclick.js"></script>

<script src="js/demo.js"></script>

<!-- MAIN APP JS FILE -->
<script src="js/app.js"></script>

<!-- Your GOOGLE ANALYTICS CODE Below -->
<script type="text/javascript">
      var _gaq = _gaq || [];
      _gaq.push(['_setAccount', 'UA-XXXXXXXX-X']);
      _gaq.push(['_trackPageview']);

      (function() {
        var ga = document.createElement('script'); ga.type = 'text/javascript'; ga.async = true;
        ga.src = ('https:' == document.location.protocol ? 'https://ssl' : 'http://www') + '.google-analytics.com/ga.js';
        var s = document.getElementsByTagName('script')[0]; s.parentNode.insertBefore(ga, s);
      })();
</script>
Icons
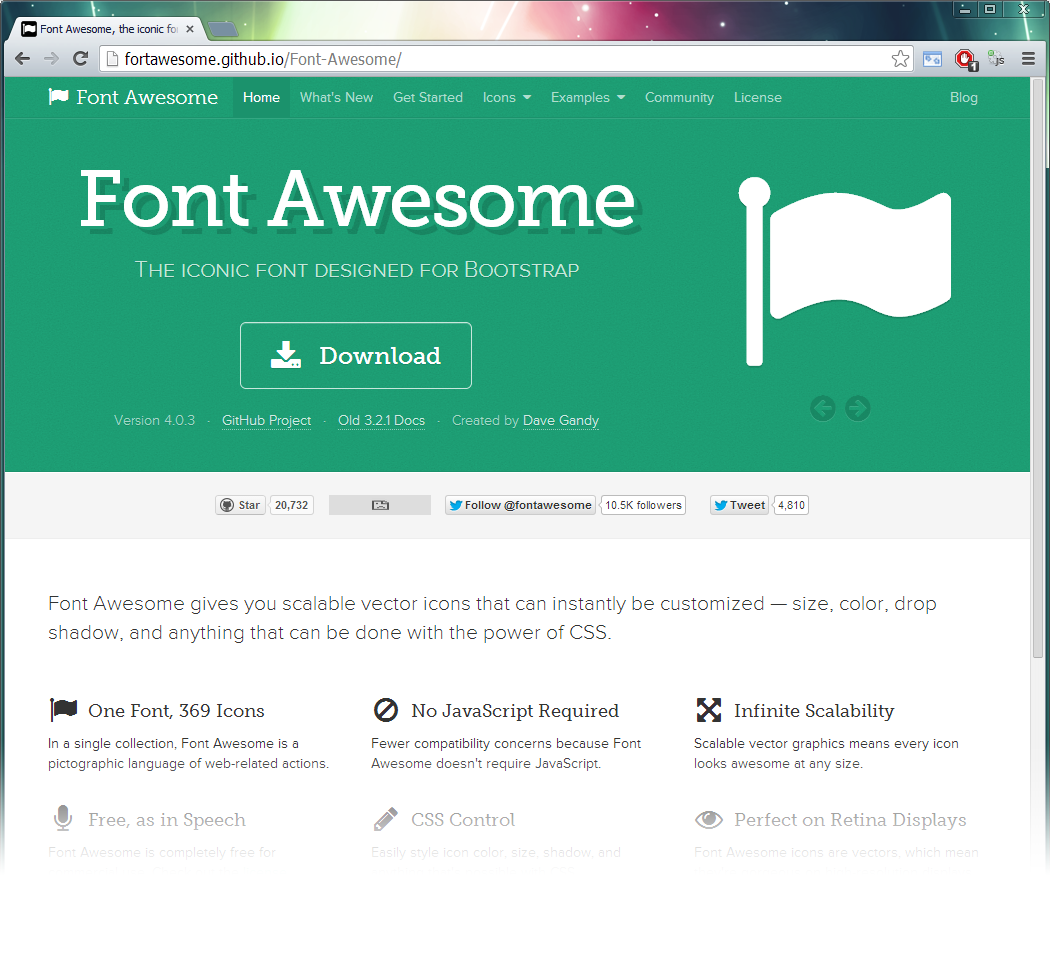
FontAwesome Icon
Font Awesome gives you scalable vector icons that can instantly be customized — size, color, drop shadow, and anything that can be done with the power of CSS.
File dependency:
<link href="css/font-awesome.min.css" rel="stylesheet">
Also make sure that the FONTS folder is sitting in your root directory
For LESS and SASS versions click here
Inline Icons
Place Font Awesome icons just about anywhere with the <i> tag.
<i class="fa fa-camera-retro"></i> fa-camera-retro
Larger Icons
To increase icon sizes relative to their container, use the fa-lg (33% increase), fa-2x, fa-3x, fa-4x, or fa-5x classes.
<p><i class="fa fa-camera-retro fa-lg"></i> fa-camera-retro</p>
<p><i class="fa fa-camera-retro fa-2x"></i> fa-camera-retro</p>
<p><i class="fa fa-camera-retro fa-3x"></i> fa-camera-retro</p>
<p><i class="fa fa-camera-retro fa-4x"></i> fa-camera-retro</p>
<p><i class="fa fa-camera-retro fa-5x"></i> fa-camera-retro</p>
Fixed Width Icons
Use fa-fw to set icons at a fixed width. Great to use when variable icon widths throw off alignment. Especially useful in things like nav lists.
<ul class="nav nav-pills nav-stacked">
  <li class="active"><a href="#"><i class="fa fa-home fa-fw"></i> Home</a></li>
  <li><a href="#"><i class="fa fa-book fa-fw"></i> Library</a></li>
  <li><a href="#"><i class="fa fa-pencil fa-fw"></i> Applications</a></li>
  <li><a href="#"><i class="fa fa-cogs fa-fw"></i> Settings</a></li>
</ul>
For a full list of icon use please go to FontAwesome Library Website
Glyphicons
Includes 200 glyphs in font format from the Glyphicon Halflings set. Glyphicons Halflings are normally not available for free, but their creator has made them available for Bootstrap free of cost. As a thank you, we only ask that you to include a link back to Glyphicons whenever possible
CLICK HERE for proper usage

Forms
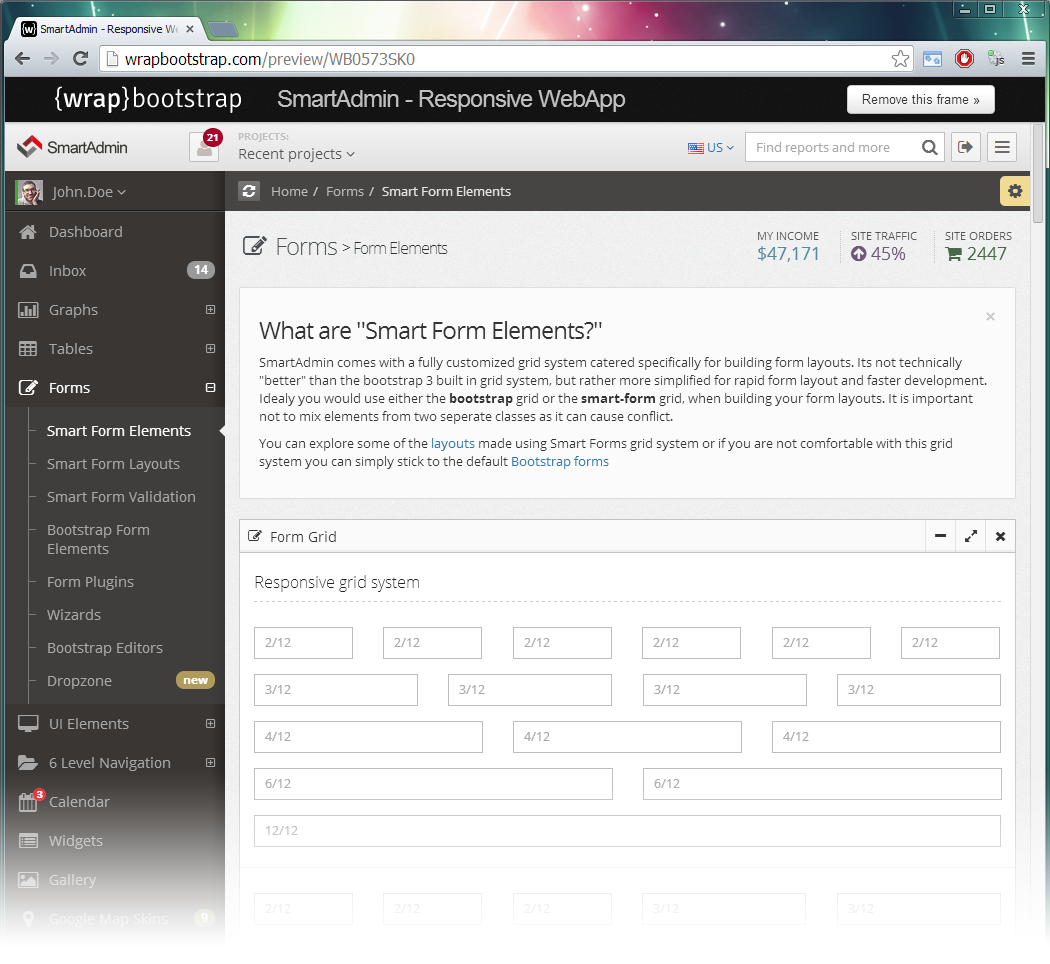
SmartAdmin comes with two type of form grids. SmartForms and the default Bootstrap Form grid. SmartForms comes with a fully customized grid system catered specifically for building form layouts. It is not technically "better" than the bootstrap 3 built in grid system, but rather more simplified for rapid form layout and faster development.
When building your form layouts, you would use either the Bootstrap or the SmartForm grid . It is important not to mix the two form grids as they can cause conflict.
SmartForm Layout
For SmartForm layouts and examples, please visit the "SmartForms" section of SmartAdmin (found under the Forms menu)
Bootstrap Form Layout
For the default bootstrap form layouts, please visit http://getbootstrap.com/css/#forms (you can visit the "Bootstrap Forms" section of SmartAdmin for further customized elements)

Plugins
SmartAdmin "Third Party Plugins"
SmartAdmin utilizes many third party plugins in order to synchronize with your need. These following plugins are constantly evolving and changing. It can get quiet difficult to keep up to date with bugs and new plugin releases. For your convenience I have included the plugin list, their home page and their relevant support form (where applicable)
Bootstrap Multiselect
Bootstrap multiselect documentation
Bootstrap Progressbar
Bootstrap Progressbar documentation
Bootstrap Max Length
Bootstrap Max Length documentation
Bootstrap Slider
Bootstrap Slider documentation
Bootstrap Tagsinput
Bootstrap Tagsinput documentation
Bootstrap Timepicker
Bootstrap Timepicker documentation
Bootstrap Wizard
Bootstrap Wizard documentation
Bootstrap TREE

Bootstrap Colorpicker
Bootstrap Colorpicker documentation
CK Editor
CK Editor documentation
Datatables
Datatables documentation
Dropzone
Dropzone documentation
Easy Pie
Easy Pie documentation
Flot Charts
Flot Charts documentation
Fuel Ux Wizard
Fuel UX Wizard documentation
Full Calendar
Full Calendar documentation
Ion Range Slider
Ion Range Slider documentation
Jquery Form
Jquery Form documentation
Jquery Nestable
Jquery Nestable documentation
JQuery UI Touch Punch
Jquery UI Touch Punch documentation
Jquery Validate
Jquery Validate documentation
Knob
Knob documentation
Markdown
Markdown documentation
Masked Input
Masked input documentation
Morris Charts
Morris Charts documentation
$.noUiSlider
noUISlider documentation
Pace.js
Pace.js documentation
Select2
Select2 documentation
SelectToUISlider
SelectToUISlider documentation
Summernote
Summernote documentation
Sparkline
Sparkline documentation
Superbox
Superbox documentation
TypeHead
TypeHead documentation
Vectormap
Vectormap documentation
Xeditable
Xeditable documentation
Charts
Flot Charts
Flot is a pure JavaScript plotting library for jQuery, with a focus on simple usage, attractive looks and interactive features. FlotChart works with Internet Explorer 6+, Chrome, Firefox 2+, Safari 3+ and Opera 9.5+
Basic Usage
Create a placeholder div to put the graph in:
<div id="placeholder"></div>
You need to set the width and height of this div, otherwise the plot library doesn't know how to scale the graph. You can do it inline like this:
<div id="placeholder" style="width:600px;height:300px"></div>
You can also do it with an external stylesheet. Make sure that the placeholder isn't within something with a display:none CSS property - in that case, Flot has trouble measuring label dimensions which results in garbled looks and might have trouble measuring the placeholder dimensions which is fatal (it'll throw an exception).
$.plot($("#placeholder"), data, options);
Here, data is an array of data series and options is an object with settings if you want to customize the plot. Take a look at the examples for some ideas of what to put in or look at the API reference. Here's a quick example that'll draw a line from (0, 0) to (1, 1):
$.plot($("#placeholder"), [ [[0, 0], [1, 1]] ], { yaxis: { max: 1 } });
For more info on FLOTCHART:
Morris Charts
<link rel="stylesheet" href="http://cdn.oesmith.co.uk/morris-0.4.3.min.css">
<script src="//ajax.googleapis.com/ajax/libs/jquery/1.9.0/jquery.min.js"></script>
<script src="//cdnjs.cloudflare.com/ajax/libs/raphael/2.1.0/raphael-min.js"></script>
<script src="http://cdn.oesmith.co.uk/morris-0.4.3.min.js"></script>
Example Chart
Start by adding a <div> to your page that will contain your chart. Make sure it has an ID so you can refer to it in your Javascript later.
<div id="myfirstchart" style="height: 250px;"></div>
Note: in order to display something, you’ll need to have given the div some dimensions. Here I’ve used inline CSS just for illustration.
Next add a <script> block to the end of your page, containing the following javascript code:
new Morris.Line({
  // ID of the element in which to draw the chart.
  element: 'myfirstchart',
  // Chart data records -- each entry in this array corresponds to a point on
  // the chart.
  data: [
    { year: '2008', value: 20 },
    { year: '2009', value: 10 },
    { year: '2010', value: 5 },
    { year: '2011', value: 5 },
    { year: '2012', value: 20 }
  ],
  // The name of the data record attribute that contains x-values.
  xkey: 'year',
  // A list of names of data record attributes that contain y-values.
  ykeys: ['value'],
  // Labels for the ykeys -- will be displayed when you hover over the
  // chart.
  labels: ['Value']
});
Statistic Elements
Easy Pie Charts

<div class="easy-pie-chart txt-color-greenLight easyPieChart"
data-percent="50"
data-pie-size="50"
data-size="180">
    <span>
       55
    </span>
</div>
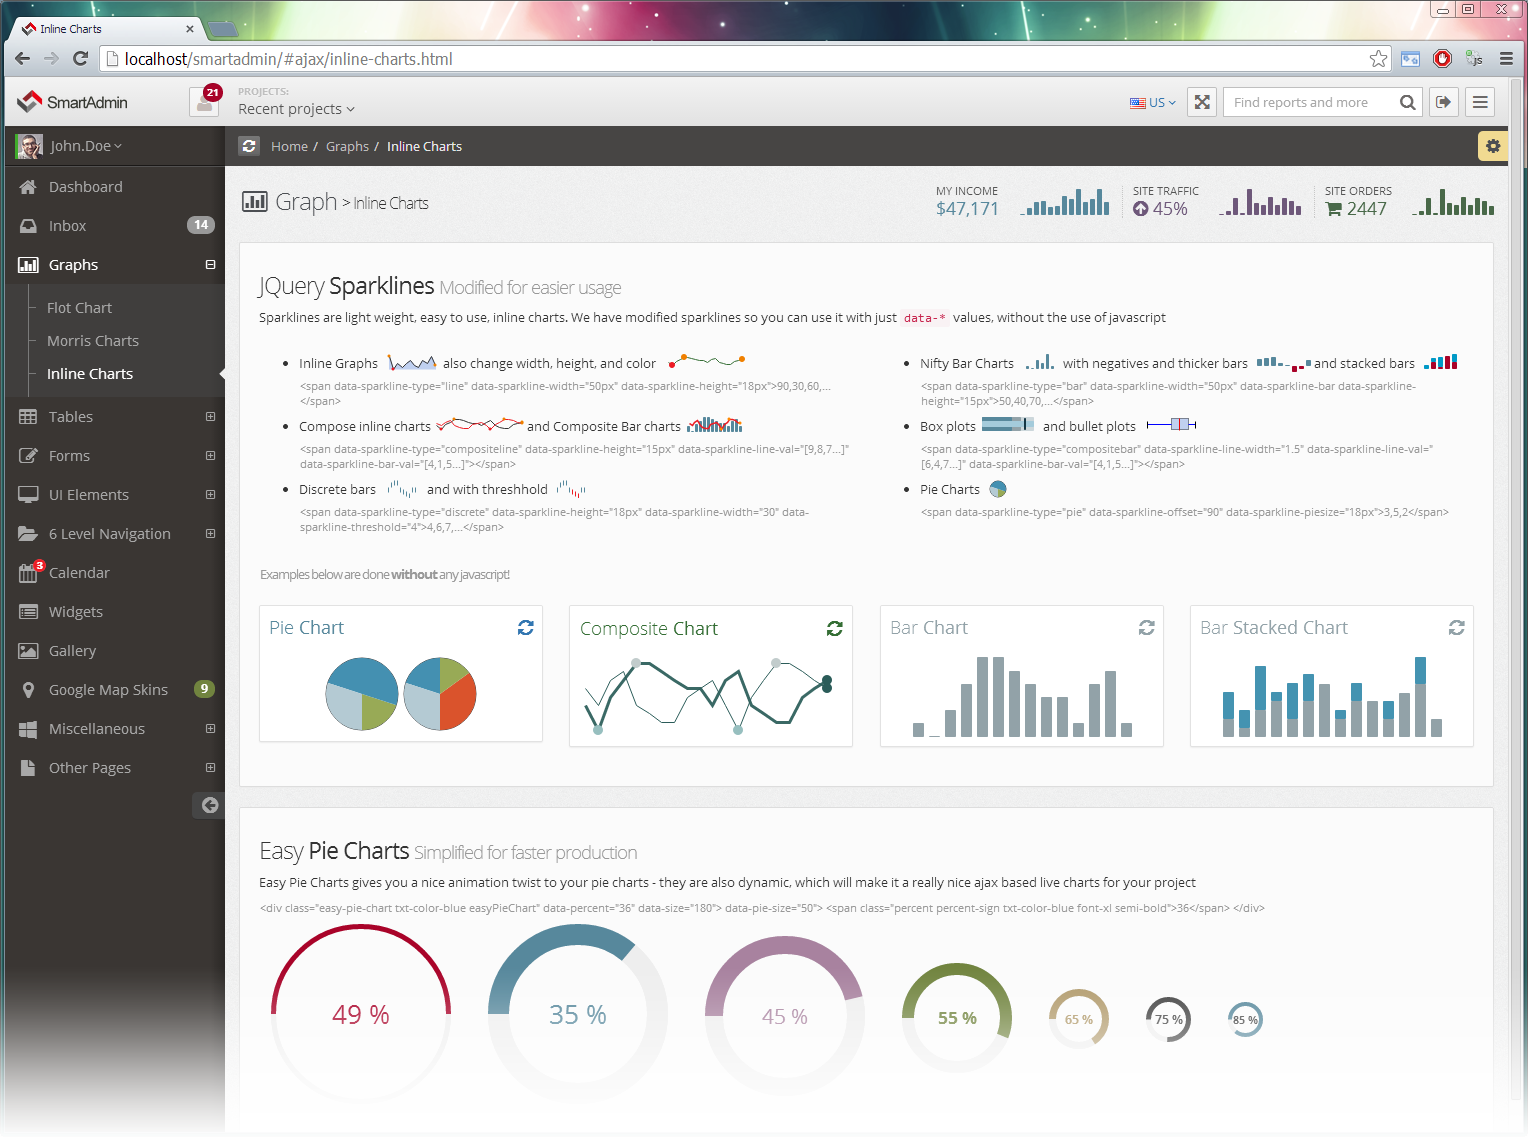
Sparkline Pie
<div class="sparkline txt-color-blue display-inline"
data-sparkline-offset="90"
data-sparkline-piesize="75px"
data-sparkline-type="pie"
data-sparkline-piecolor="['#E979BB', '#57889C']">
    3,5,2
</div>
Sparkline Composite
<div class="sparkline"
data-sparkline-bar-val="[4,1,5,7,9,9,8,7,6,6,4,7,8,4,3,2,2,5,6,7]"
data-sparkline-color-bottom="#2b5c59"
data-sparkline-color-top="#3a6965"
data-sparkline-height="78px"
data-sparkline-highlightline-color-top="#cce8e4"
data-sparkline-highlightspot-color-top="#9dbdb9"
data-sparkline-line-val="[6,4,7,8,4,3,2,2,5,6,7,4,1,5,7,9,9,8,7,6]"
data-sparkline-line-width-top="3"
data-sparkline-maxspot-color-top="#c2cccc"
data-sparkline-minspot-color-top="#97bfbf"
data-sparkline-spot-color="#2b5c59"
data-sparkline-spotradius-top="5"
data-sparkline-type="compositeline"
data-sparkline-width="96%"></div>
Sparkline Bar Chart
<div class="sparkline txt-color-blueLight text-center"
data-sparkline-barspacing="5"
data-sparkline-barwidth="11"
data-sparkline-height="80px"
data-sparkline-type="bar"
data-sparkline-width="96%">
    4,3,5,7,9,9,8,7,6,6,4,7,8,4
</div>
UI Elements
General Elements
Alerts

<div class="alert alert-warning fade in">
   <button class="close" data-dismiss="alert">×</button>
   <strong>Warning</strong> Your monthly traffic is reaching limit.
</div>
Progressbars (please see the General Elements page for more examples)

<div class="progress progress-sm">
   <div class="progress-bar bg-color-greenLight" style="width: 40%"></div>
</div>
The following classes can be used ".progress-micro", ".progress-xs", ".progress-sm", ".progress-lg"
Tabs (please view the tabs section in General Elements page for more examples)

<ul class="nav nav-tabs bordered" id="myTab1">
    <li class="active"><a data-toggle="tab" href="#s1">Left Tab
    <span class="badge bg-color-blue txt-color-white">12</span></a></li>
    <li><a data-toggle="tab" href="#s2">Tab Item 2</a></li>
    <li class="dropdown">
        <a class="dropdown-toggle" data-toggle="dropdown" href="javascript:void(0);">Dropdown</a>
        <ul class="dropdown-menu">
            <li><a data-toggle="tab" href="#s3">@fat</a></li>
            <li><a data-toggle="tab" href="#s4">@mdo</a></li>
        </ul>
    </li>

    <li class="pull-right">
         [SPARKLINE_GRAPH]
    </li>
</ul>

<div class="tab-content padding-10" id="myTabContent1">
    <div class="tab-pane fade in active" id="s1">
         [TAB_CONTENT_1]
    </div>

    <div class="tab-pane fade" id="s2">
          [TAB_CONTENT_2]
    </div>

    <div class="tab-pane fade" id="s3">
         [TAB_CONTENT_3a]
    </div>

    <div class="tab-pane fade" id="s4">
        [TAB_CONTENT_3b]
    </div>
</div>
Accordions

Buttons

Tables
SmartAdmin uses the default table CSS from the core bootstrap CSS file. For more information please visit: http://getbootstrap.com/css/#tables

Datatables
SmartAdmin uses the plugin "datatables" for dynamic table content and table data alterations. More about this plugin can be found on datatables.net.

Smart Widgets
The all new and revolutionary JarvisWidgets v2.0 ($35 value) is now only exclusive to SmartAdmin. JarvisWidgets allows you to do more than your normal widgets. You can now use realtime AJAX loading in a snap with auto refresh. Add Infinite buttons and controls to widget header. All widgets are Sortable across all bootstrap col-spans and uses HTML5 localStorage. Also now supports RTL Support, Crossbrowser Support, Callback functions and More.
 $('#widget-grid').jarvisWidgets({

    grid: 'article',
    widgets: '.jarviswidget',
    localStorage: true,
    deleteSettingsKey: '#deletesettingskey-options',
    settingsKeyLabel: 'Reset settings?',
    deletePositionKey: '#deletepositionkey-options',
    positionKeyLabel: 'Reset position?',
    sortable: true,
    buttonsHidden: false,

    // toggle button
    toggleButton: true,
    toggleClass: 'fa fa-minus | fa fa-plus',
    toggleSpeed: 200,
    onToggle: function () {},

    // delete btn
    deleteButton: true,
    deleteClass: 'fa fa-times',
    deleteSpeed: 200,
    onDelete: function () {},

    // edit btn
    editButton: true,
    editPlaceholder: '.jarviswidget-editbox',
    editClass: 'fa fa-cog | fa fa-save',
    editSpeed: 200,
    onEdit: function () {},

    // color button
    colorButton: true,

    // full screen
    fullscreenButton: true,
    fullscreenClass: 'fa fa-resize-full | fa fa-resize-small',
    fullscreenDiff: 3,
    onFullscreen: function () {},

    // custom btn
    customButton: false,
    customClass: 'folder-10 | next-10',
    customStart: function () {
        alert('Hello you, this is a custom button...')
    },

    customEnd: function () {
        alert('bye, till next time...')
    },

    // order
    buttonOrder: '%refresh% %custom% %edit% %toggle% %fullscreen% %delete%',
    opacity: 1.0,
    dragHandle: '> header',
    placeholderClass: 'jarviswidget-placeholder',
    indicator: true,
    indicatorTime: 600,
    ajax: true,
    timestampPlaceholder: '.jarviswidget-timestamp',
    timestampFormat: 'Last update: %m%/%d%/%y% %h%:%i%:%s%',
    refreshButton: true,
    refreshButtonClass: 'fa fa-refresh',
    labelError: 'Sorry but there was a error:',
    labelUpdated: 'Last Update:',
    labelRefresh: 'Refresh',
    labelDelete: 'Delete widget:',
    afterLoad: function () {},
    rtl: false, // best not to toggle this!
    onChange: function () {

    },
    onSave: function () {

    },
    ajaxnav: $.navAsAjax // declears how the localstorage should be saved
});
Notice the custom icon classes, we add the | to separate each toggle state for the icon. You can change any of the icons using the fontawesome library classes. Please be mindful for the icon size as it will break the layout when you use classes such as ".fa-2x"
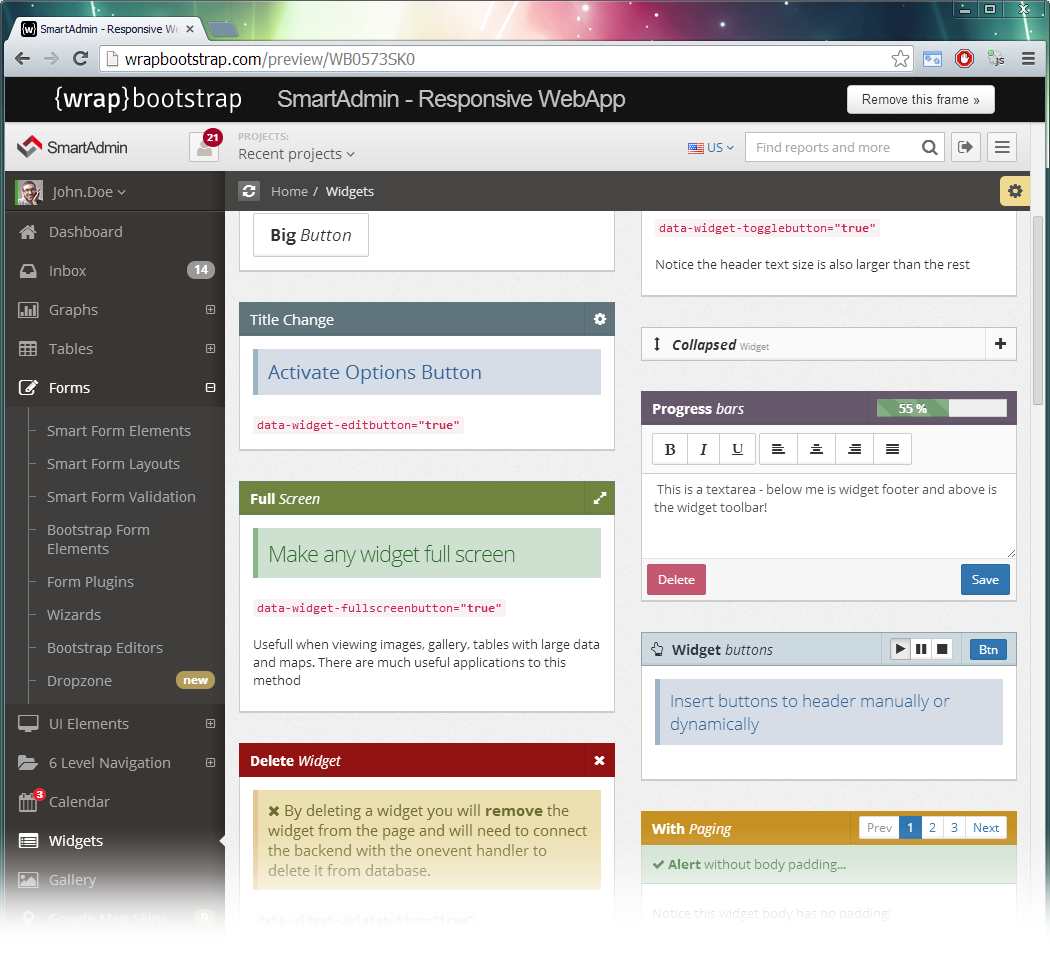
Widget Structure
All widgets must be placed inside the #widget-grid container followed by <article>[your_widgets]</article>
Example layout structure (this should be inside the #content container )
Example below is a Single grid layout:
    <section id="widget-grid">
        <!-- row -->
        <div class="row">
            <!-- SINGLE GRID -->
            <article class="col-xs-12 col-sm-12 col-md-12 col-lg-12">

                [YOUR_WIDGET_#1]

            </article><!-- GRID END -->
        </div><!-- end row -->
    </section>
Example below is a Multiple grid layout:
    <section id="widget-grid">

        <!-- row -->

        <div class="row">
            <!-- SINGLE GRID -->
            <article class="col-xs-12 col-sm-6 col-md-6 col-lg-6">

                [YOUR_WIDGET_#1]

                [YOUR_WIDGET_#2]

            </article><!-- END GRID -->

            <!-- SINGLE GRID -->
            <article class="col-xs-12 col-sm-6 col-md-6 col-lg-6">

                [YOUR_WIDGET_#3]

                [YOUR_WIDGET_#4]

            </article><!-- END GRID -->

        </div><!-- end row -->

    </section><!-- end widget grid -->
Widget layout
Caution: ID of the widget does not control where the widget should be on the page rather it works as an identifier for the localStorage. If you wish to rearrange the widget with hard code make sure to clear the localStorage and hit refresh to see the new arrangement
    <div class="jarviswidget" id="wid-id-0">

        <header>
            <h2>Widget Title</h2>
        </header><!-- widget div-->

        <div>
            <!-- widget edit box -->
            <div class="jarviswidget-editbox">
                <!-- This area used as dropdown edit box -->
                <input class="form-control" type="text">
            </div><!-- end widget edit box -->

            <!-- widget content -->
            <div class="widget-body">

                [PLACE WIDGET CONTENTS HERE]

            </div><!-- end widget content -->
        </div><!-- end widget div -->
    </div><!-- end widget -->
Widget Controls
| HTML5 data attributes / CSS / HTML | Place after | Example value(s) | Desctription |
|---|---|---|---|
|
These HTML5 attributes are used as individual widget options. Main options can be changed in the widgets plugin it self. Notice: data attributes can only have 1 boolan value(see above)!
|
|||
| data-widget-sortable |
header |
false | Prevent a widget from being sortable (can only be used with the value 'false'). |
| data-widget-icon |
.jarviswidget |
fa fa-trash | Use a icon in the widgets header (see icons section for all list of icons). |
| data-widget-togglebutton |
.jarviswidget |
false | Prevent a widget from having a toggle button (can only be used with the value 'false'). |
| data-widget-deletebutton |
.jarviswidget |
false | Prevent a widget from having a delete button (can only be used with the value 'false'). |
| data-widget-editbutton |
.jarviswidget |
false | Prevent a widget from having a edit button (can only be used with the value 'false'). |
| data-widget-fullscreenbutton |
.jarviswidget |
false | Prevent a widget from having a fullscreen button (can only be used with the value 'false'). |
| data-widget-load |
.jarviswidget |
widget-ajax.php | The file that is loaded with ajax. |
| data-widget-refresh |
.jarviswidget |
10 | Seconds to refresh a ajax file (see 'data-widget-load'). |
| data-widget-refreshbutton |
.jarviswidget |
false | Prevent a ajax widget from showing a refresh button (can only be used with the value 'false'). |
| data-widget-hidden |
.jarviswidget |
true | Hide a widget at load (can only be used with the value 'true'). |
| data-widget-colorbutton |
.jarviswidget |
false | This is active by default, set it to false to hide. |
| data-widget-collapsed |
.jarviswidget |
false | Collapse a widget upon load (can only be used with the value 'true'). This will allways be collapsed every page load. |
| data-widget-grid |
article |
false | You can exclude grids from being a sortable/droppable area, this means that all widgets in this area will work, but cant be sortable/droppable and that all other widgets cant be dropped in this area. Add this attribute (can only be used with the value 'false') to a grid element. |
.no-padding |
.widget-body |
n/a | Removes all padding inside widget body |
.well |
.jarviswidget |
n/a | Converts a widget to a well |
You will see lots more example if you visit the Smart Widgets page from the SmartAdmin menu:
Intro to App.js
Don't be afraid to dig into app.js!!
I know a lot of you are afraid to dig in and change variables and move codes around. I have designed app.js to be very user friendly, left helpful comments, hints and notes - please don't be afraid to dig around. :)
/*
 * PAGE SETUP
 * Description: fire certain scripts that run through the page
 * to check for form elements, tooltip activation, popovers, etc...
 */

function pageSetUp() {
    if ($.device === "desktop") {
        // is desktop
        // activate tooltips
        $("[rel=tooltip]").tooltip();
        // activate popovers
        $("[rel=popover]").popover();
        // activate popovers with hover states
        $("[rel=popover-hover]").popover({
            trigger: "hover"
        });
        // activate inline charts
        runAllCharts();
        // setup widgets
        setup_widgets_desktop();
        //setup nav height (dynamic)
        nav_page_height();
        // run form elements
        runAllForms();
    } else {
        // is mobile
        // activate popovers
        $("[rel=popover]").popover();
        // activate popovers with hover states
        $("[rel=popover-hover]").popover({
            trigger: "hover"
        });
        // activate inline charts
        runAllCharts();
        // setup widgets
        setup_widgets_mobile();
        //setup nav height (dynamic)
        nav_page_height();
        // run form elements
        runAllForms();
    }
}
LESS Files
You will find the SmartAdmin LESS files under the COMMON_ASSETS folder located inside the Developer Folder. You will also find the Email templates here.
Normally I will only upgrade less files when there is a major release (for example 3.1, 3.2, 3.3 etc)

Compile Instructions
Download link: http://alphapixels.com/prepros/
Themes
Smart Default
<body class="smart-style-0">...</body>

Dark Elegance
<body class="smart-style-1">...</body>

Ultra White
<body class="smart-style-2">...</body>

Google Skin (google analytics)
<body class="smart-style-3">...</body>
Animation.css
SmartAdmin has a built in animation core system (built by Danial Eden), it uses the "animation.less" file to generate almost all kinds of animation which can be applied to various HTML objects within your project by adding simple classes.
Proper Usage:
Speed up the animation by adding the class "fast", for example...
List of possible animation types:
Attention Seekers
- bounce
- flash
- pulse
- shake
- swing
- tada
- wobble
Bouncing Entrances
- bounceIn
- bounceInDown
- bounceInLeft
- bounceInRight
- bounceInUp
Bouncing Exists
- bounceOut
- bounceOutDown
- bounceOutRight
- bounceOutUp
- fadeIn
- fadeInDown
- fadeInDownBig
- fadeInLeft
- fadeInRight
- fadeInRightBig
- fadeInUp
- fadeInUpBig
- fadeOut
- fadeOutDown
- fadeOutDownBig
- fadeOutLeft
- fadeOutLeftBig
- fadeOutRight
- fadeOutRightBig
- fadeOutUp
- fadeOutUpBig
- flip
- flipInX
- flipInY
- flipOutX
- flipOutY
- lightSpeedIn
- lightSpeedOut
- rotateIn
- rotateInDownLeft
- rotateInDownRight
- rotateUpLeft
- rotateInUpRight
- rotateOut
- rotateOutDownLeft
- rotateOutDownRight
- rotateOutUpLeft
- rotateOutUpRight
- slideInDown
- slideInLeft
- slideInRight
- slideOutLeft
- slideOutRight
- slideOutUp
- hinge
- rollIn
- rollOut
Licenses
- Bootstrap progressbar v0.6.0 (MIT License)
- Bootstrap Max Length v1.4.2 (MIT License)
- Bootstrap slider v2.0.0 (Apache License, Version 2.0)
- Bootstrap Tagsinput v0.3.9 (MIT License)
- Bootstrap Timepicker (MIT License)
- Bootstrap Wizard 1.0 (available in MIT & GPL Licenses)
- Bootstrap Colorpicker v2.0 (Apache License, Version 2.0)
-
CK Editor (available in GPL, LGPL and MPL Licenses)
You can exclude CKEditor plugin if you plan to redistrubute your project under extended license
- Datatables 1.9.4 (BSD & GPL Version 2 Licenses)
- Dropzone (MIT License)
- Easy Pie 1.2.1 (available in MIT & GPL Licenses)
- FastClick 0.6.7 (MIT License)
- Flot Charts v.0.7 (customized) - (MIT License)
- Fuel Ux Wizard (MIT License)
- Full Calendar v1.5.4 (available in MIT & GPL License)
- Ion Range Slider 1.7.2 (MIT License)
- Jquery Form (available in MIT & GPL Licenses)
- Jquery Nestable (available in BSD & MIT Licenses)
- JQuery UI Touch Punch 0.2.2 (available in MIT & GPL Version 2 Licenses)
- Jquery Validate v1.11.0 (MIT License)
- JQuery Migrate v1.2.1 (MIT License)
- Knob v1.2.0 (available in MIT & GPL Licenses)
- Markdown (MIT License)
- Masked Input v1.3.1 (MIT License)
- Morris Charts (BSD License)
- MSIE-FIX v1.0 (MIT License)
- $.noUiSlider (WTFPL[No Restrictions])
- Pace.js (Free of use license - https://github.com/HubSpot/pace/blob/master/LICENSE)
- Select2 v3.4.5 (customized) - (Apache License, Version 2.0)
- SelectToUISlider v1.0 (available in MIT & GPL Licenses)
- Summernote v0.5 (MIT License)
- Sparkline v2.1.2 (BSD License)
- Superbox v0.9.1 (available in MIT & BSD Licenses)
- ThrottleDebounce v1.1 (MIT & GPL Licenses)
- TypeHead (MIT License)
- Vectormap v1.1 (MIT License)
- Xeditable v1.5.0 (MIT License)
Licenses below are subject to the license type you own for SmartAdmin
- Bootstrap TREE 1.0 (Part of SmartAdmin Theme)
- SmartNotifications v.1.0
- Delete Row v1.0
- JarvisWidget v2.01
- App.js v1.3
Product Licenses
SmartAdmin comes with various product licenses for you to choose from. It offers Single License, Multiple License and Extended Licenses. To learn more about the license types and its terms please visit http://support.wrapbootstrap.com/knowledge_base/topics/usage-licenses
Support and FAQs
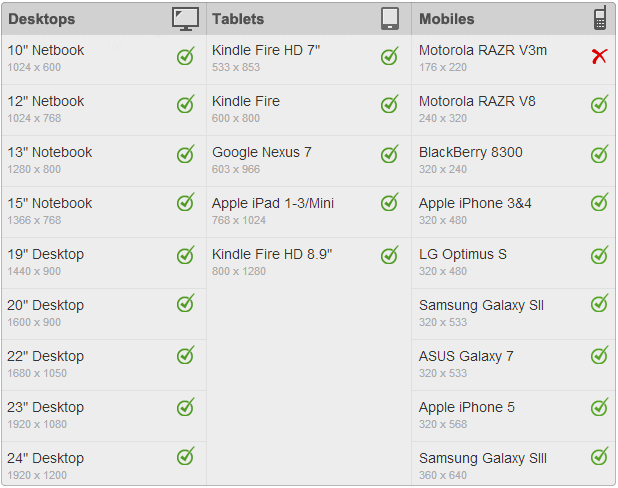
Q: Can I turn off Responsiveness?
Responsiveness is built into the theme core CSS and bootstrap Core CSS by default. You will not be able to turn off responsive layout without changing a huge portion of the bootstrap CSS core.
Q: The demo version of SmartAdmin keeps crashing on my mobile device.
This is perfectly normal. The demo version of SmartAdmin is built heavily with javascript and was only for the purpose of demo (ideally desktop). When you create your webapps for mobile, you will not be using so many components at once.
Q: How do I post variables when using the AJAX version?
As of version 1.3 of SmartAdmin, I have added a param URL search function that will search for the param text string which you can catch and read.
For example:
<form action="#ajax/search.html" class="header-search pull-right">
  <input type="text" name="param" placeholder="Find reports and more" id="search-fld" />
  <button type="submit">Search</button>
</form>
This will put the a "param" text string to the URL:
smartadmin/?param=my+search+word#ajax/search.html
Q: Some of my graphs do not render when the div/container is hidden
This is a bug related to morris charts and sparkline charts, and not part of SmartAdmin. Morris and sparkline chart cannot render the graphs if the div element containing the graph is hidden in intial load. There might be ways around this but you will need to hack a lot of code, which is genereally not recommend. Best option for such a scenario would be to go with flot.js charts
Q Is there any custom CSS classes that can be used for margins and absolute positions?
Of course! Here are a list of custom CSS classes you can use:
/*
 * Forced text alignments
 */
.text-align-center,.text-center {
    text-align: center !important;
}

.text-align-left,.text-left {
    text-align: left !important;
}

.text-align-right,.text-right {
    text-align: right !important;
}

/*
 * Font Weights
 */
.semi-bold {
    font-weight: 400 !important;
}

.ultra-light {
    font-weight: 300 !important;
}

/*
 * Font Sizes
 */
.font-xs {
    font-size: 85% !important;
}

.font-sm {
    font-size: 95% !important;
}

.font-md {
    font-size: 130% !important;
}

.font-lg {
    font-size: 160% !important;
}

.font-xl {
    font-size: 200% !important;
}

.font-400 {
    font-size: 400% !important;
}

/*
 * Center Canvas
 */
.center-canvas,.center-child-canvas > canvas {
    display: block !important;
    margin: 0 auto !important;
}

/*
 * Margins
 */

.no-margin {
    margin: 0 !important;
}

.margin-top-5 {
    margin-top: 5px !important;
}

.margin-top-10 {
    margin-top: 10px !important;
}

.margin-bottom-5 {
    margin-bottom: 5px !important;
}

.margin-bottom-10 {
    margin-bottom: 10px !important;
}

.margin-right-5 {
    margin-right: 5px !important;
}

/*
 * No border
 */
.no-border,.well[class*=" bg-"].no-border {
    border-width: 0 !important;
}

.no-border-transparent {
    border-color: transparent !important;
}

.no-border-radius {
    border-radius: 0;
    -moz-border-radius: 0;
    -webkit-border-radius: 0;
}

/*
 * Inlines
 */
.display-inline {
    display: inline-block !important;
}

.display-normal {
    display: inline !important;
}

/*
 * Images
 */
.hover-transparent {
    opacity: .5;
}

.hover-transparent:hover {
    opacity: 1;
}

/*
 * JUST A BORDER
 */
.bordered {
    border: 1px solid rgba(0,0,0,.2);
}

.bordered:hover {
    border: 1px solid rgba(0,0,0,.4);
}

/*
 * CURSORS
 */
.cursor-pointer {
    cursor: pointer;
}
.padding-5 {
    padding: 5px !important;
}

.padding-7 {
    padding: 7px !important;
}

.padding-10 {
    padding: 10px !important;
}

.padding-top-10 {
    padding-top: 10px !important;
}

.padding-bottom-10 {
    padding-bottom: 10px !important;
}
Q: What version should I use when developing this theme in .Net MVC framework?
I would recommend using the HTML_version found in the Developers folder. Please note that .NET will add some classes that will mask input CSS styles for radio and checkboxes.
Q: Do you have plans to release this in IE8 version?
At the moment no I do not, but there should be ways to convert the pure HTML_version to IE8 format using respond.js. I have yet to test this, but it should be doable.
Q: What kind of support do I get with SmartAdmin?
Please note I do not provide extended support for third party plugins (combining two or more plugins to achieve certain result). Other than that I can help you anything else that is not covered in this documentation, given that you have basic knowledge on HTML/HTML5, JavaScript and CSS.
Updates
- Upgrade to Bootstrap Framework 3.1.1
- Added Documentation
- Added 1 additional skin
- Added pages: Profile page, Forum page, Timeline page, Forgot password page
- Added Fullscreen function (does not support IE9)
- Updated app.js to have url with query strings like the google search - available only for the ajax version
- Added Splash screens and home screen icons for iDevices
- Slight DOM change was made to <div class="login-info">...</div>. CSS/LESS and CSS skins was updated accordingly. This was done to truncate long user names
- Added additional bootstrap form elements (see the new section "Flexible Input fields with icons" inside the Bootstrap Form Elements page)
- Added logout message localization handler using data-attribute
- Define file path variable for sound files
- Fixed various CSS bugs and memory leaks
- Added Basic PHP_version (template) to get you started
- Added non-ajax version for SmartAdmin
- Updated jarvis.widget to work with non-ajax page view (Jarvis widget now includes onSave and OnLoad hooks to be saved into the database)
- app.js has been significantly reworked - users can switch on / off plugins and features more easily
- LESS files are now more modular, new variables are added for better control
- Update Select2 to latest version (3.4.5)
- All ajaxed pages now scroll to top when loading a new page
- Nav menu clicks now updates title
- Added new custom plugin "SmartClick" - this will counter the 300ms delay click in iDevices (this is turned off by default - see app.js to turn it on)
- Fixed CSS issue with X-editable date popup
- Fixed Android mobile menu bug
- Typo in main.less file that resulted certain @media width content to not adjust properly on iPad view
- Function for drawing breadcrumb was running for all ajax calls - this now checks the container and runs the function when appropriate
- Removed CSS3 wobble animation from menu items to save memory on touch devices
- Removed animation from menu slide in / out to save mobile memory
- Added the 3 missing images to the image library (also deleted reference to images in CSS that were not being used)
- SmartAdmin theme is now built with LESS - previous CSS files are deprecated!
- Added 2 new Skins - Dark Elegance and Ultra White (see the settings panel - cog icon top right corner )
- Improved repainting for touch devices
- Fixed ajax bug and all IE 9 related issues (IE users will need to close the WrapBootstrap iFrame when viewing the demo)
- Ajax scripts now load faster
- Initial release