ls ccd*fits > fitsfiles.lisPut the new names in another file called e.g. files.lis: if you're familiar with the sed command you might do
< fitsfiles.lis sed 's/ccd040/s4/' | sed 's/B//' > files.listhen in your xgterm window, do
rfits @fitsfiles.lis "" @files.lisYou'll do all the rest of your work on these files, so you can delete or archive your ccd*fits files now if you like. On the other hand, disk space is cheap, plus this allows you to delete everything else and start again if you should need to!
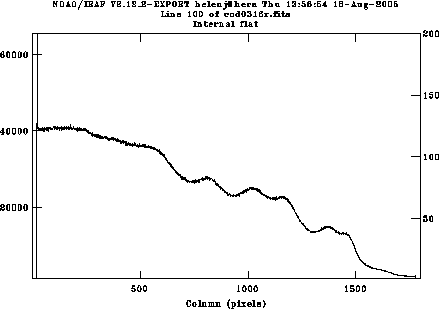
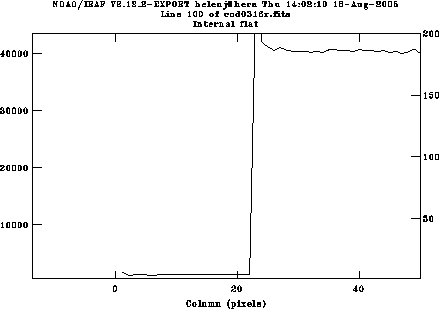
Use c and l switch between lines and columns; if you want to average over several lines or columns, use e.g. :a 5 to average over 5 pixels; this will take effect next time you move to a different line or column. Zooming in on the left edge (indicate the lower left and upper right corners of the rectangle you want to zoom in on using the e key) shows that useful data starts at pixel 26. Use r to redraw the whole plot and e again on the right hand edge, to see that useful data ends at pixel 1772. We will also keep columns 1777:1798 for the overscan region. Plot a column and decide if you want to keep the whole range in y; if the chip has already been windowed at the telescope, so is already only 200 pixels wide, you don't need to change anything. If there are more than 200 rows, it doesn't hurt, in which case your range will be 1:532; or you might choose to just keep e.g. pixels 200:400.
ccdlist s*.fits > headers.liswhich will give you a list looking like
s309r.fits[1798,200][ushort][zero][]:bias
s310r.fits[1798,200][ushort][zero][]:bias
s311r.fits[1798,200][ushort][dark][]:dark
s316r.fits[1798,200][ushort][object][]:Internal flat
s317r.fits[1798,200][ushort][object][]:Internal flat
s320r.fits[1798,200][ushort][object][]:Ne Ar
s321r.fits[1798,200][ushort][object][]:Ne Ar
s322r.fits[1798,200][ushort][object][]:Ne Ar
s323r.fits[1798,200][ushort][object][]:Ne Ar
s324r.fits[1798,200][ushort][object][]:Cu Ar
s325r.fits[1798,200][ushort][object][]:Cu Ar
s327r.fits[1798,200][ushort][object][]:HD 16160
s328r.fits[1798,200][ushort][object][]:HD 16160
This shows the name of each file, size, data type, image type, an empty field which for imaging would show filter, and the object name. It's the image type (third bracket) you need to check and correct here; possible values are zero (bias frames), flat, comp (arc frames) and object. Extract all the arc files into another list
grep arc headers.lis > arcs.lisedit the file arcs.lis to remove all the header information, so it just looks like
s320r.fits
s321r.fits
s322r.fits
then change the type of all these files to comp by doing
ccdhedit @arcs.lis imagetype compCheck the biases and flats all have the right types and fix them if necessary.
grep Bias headers.lis > biasfile
grep flat headers.lis > flatfile
edit these files, and run ccdhedit again. Do the same for the objects, which should be everything else.
ccdhedit s*fits RO_NOISE 3.85
ccdhedit s*fits RO_GAIN  1.24
while for DBS blue you'd use
ccdhedit s*fits RO_NOISE 3.5
ccdhedit s*fits RO_GAIN  1.04
Inputs: zerocombine.par.
The output looks like
Jan 27 14:48: IMCOMBINE
  combine = average, scale = none, zero = none, weight = none
  reject = minmax, nlow = 0, nhigh = 1
  blank = 0.
                Images
              s301r.fits
              s302r.fits
              s303r.fits
              s304r.fits
              s305r.fits
              s306r.fits
              s307r.fits
              s308r.fits
              s309r.fits
              s310r.fits

  Output image = Zero, ncombine = 10
Inputs: ccdproc.par.
Check particularly that biassec and trimsec are set to the values you determined above. zero should be set to the name of the file you created using zerocombine, in this case Zero.fits.
By leaving the output list blank, the input files will be replaced by the trimmed, bias-subtracted versions.
- The usual procedure has you just combining all your flats into a
single master flat-field for the whole night. I generally use only
the internal flats; you could use dome flats instead, but I don't
think the two sorts should be combined. Create a list containing
just the names of whichever sort you want to use called
flats.lis, then run flatcombine.
Inputs: flatcombine.par.
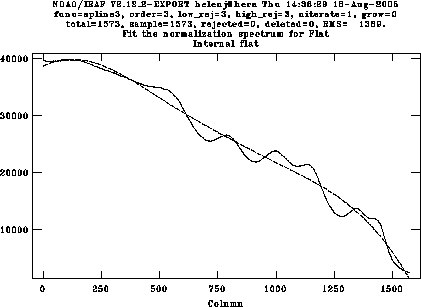
Divide this flat-field by a polynomial fit to remove the worst of the wavelength response, using the task response in twodspec.longslit.
Inputs: response.par.
The order of the fitting function can be changed interactively by typing e.g. :o 4 to change to 4th order, then f to do the fit. The idea is to remove the gross variation with wavelength but retain all the wiggles and fringing which is what we want to remove.
- With the new DBS chips, however, fringing is
really bad, and you have to flatten using an internal flat taken at
exactly the same telescope position and time as your object. This
means we can't make a global flat-field, but have to create a
separate one for each object. To do that, we first median-filter each
flat with a 101×101 pixel box (this takes a while!), then
divide each flat by this median-filtered image (so all the values
are near 1.0, so individual pixel responses can be removed). So do
the following: if the list of your flat fields is in
flatfile (you should have created this earlier when you
were fixing the headers), then make a new list containing names of
median-filtered files
< flatfile sed 's/.fits/med.fits/' > flatfilemed
median filter the raw flatsmedian @flatfile @flatfilemed 101 101 verbose+
Create a new list for the normalised flats, then divide one lot by the other:< flatfilemed sed 's/med/norm/' > flatfilenorm imarith @flatfile / @flatfilemed @flatfilenorm
- If you have a single flat for the
whole night, this is just a matter of running ccdproc
for a second time. This time we set flatcor=yes and
flat to the name of the normalised flat-field we just
created, nFlat.
Inputs: ccdproc2.par.
(Note we don't have to turn off the trimming and bias options, because Iraf knows it's already been done, so won't do it again).
- If you've got lots of separate flats,
however, you need to apply the correct flat to each object. This
requires getting the log of observations, starting with a list of
objects, and adding the name of the correct flatfield by hand. Create
a command file called flat.cl that looks like
ccdproc s314 flat=s316norm overscan- trim- zerocor- flatcor+
ccdproc s319 flat=s317norm overscan- trim- zerocor- flatcor+
ccdproc s320 flat=s322norm overscan- trim- zerocor- flatcor+
ccdproc s325 flat=s323norm overscan- trim- zerocor- flatcor+
where you've carefully checked which flat you need; then run this file by typingcl < flat.cl
figaro
figdisp
rdfits s101.fits s101 swap=no \\\\
The four backslashes are very important: if you really want me to explain what they're for, I will, but it doesn't really matter! You can look at your image using
image s101 res \\\\(the display can be resized with the mouse to show the whole spectrum, and hitting the F7 key on your keyboard re-centres it). Then type
cleanand choose a name for the cleaned file (I usually just add a c, so use s101c for the output). Find the cosmic rays: the E key to expand the image doesn't work, so just expand using the F2 key, find any cosmic rays (only bother with the ones right near your spectrum) and remove them. You get to choose whether to interpolate over the bad region in X or in Y; X smears in the spectral direction, so is usually not the preferred choice. Remove everything that's really egregious -- you move around the image by just clicking where you want the new centre to be -- then write your file back into FITS format:
wdfits s101c s101c.fitsNow you're ready to continue on: just don't forget to use your cleaned image for the rest, not the original one!
Inputs: apall.par.
(The parameters in epar are not in the same order as in this list: nfind doesn't occur till the third page, for instance).
Start the program using
apall @extract.liswhere extract.lis contains the files you want spectra extracted from: just your objects, some of which may have been cleaned in the last step.
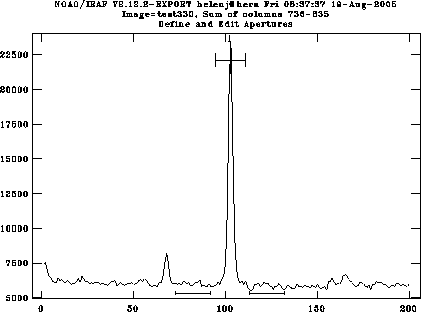
apall works in several steps. First you are shown a cut through the spectrum; it will have selected the highest peak. If it's the wrong one, type d to delete the current peak, move the cursor to the correct peak, then type m to mark it.
If you can't see your object, you may need to move to a different part of the slit to find it, e.g. Cir X-1 is almost invisible in the blue, so you want to look at a cut through the red end. Type :line N where N is the column you want the cut to be taken through (in fact, the centre of nsum pixels summed; if you want to sum more pixels change nsum to something large, say 100, by typing
:nsum 100and the object will stand out better).
You may need to re-size the extraction window (i.e. how many rows it's going to extract) if you select a new object: when the correct object is selected, type z to re-size to the width specified in apall.par (if you copied the example exactly, this will be the width which includes all pixels brighter than 50% of the peak flux). Think carefully about whether you want to try to include all the flux from the object -- at the cost of adding extra noise -- or whether you're better off just taking the high S/N pixels at the centre of the spectrum, which is often better for getting redshifts, for instance.
If the observer was sensible, they put every object in almost the same place on the chip, so you know from your standard stars where you expect your object to be (roughly).
When you have the right peak, type b to enter the background selector. By default (using the inputs above) it uses pixels -10 to -20 and +10 to +20 for the background; check this doesn't contain any stars. If it does, re-define the region by typing t to remove all the regions, then move to the left edge of the region you want to use for the background and type s, then again at the right edge; and then define the second region on the other side of the object the same way. Type f to fit the background, then q to return to the aperture editor.
When you have the right object and background, type q. It asks if you want to trace the spectrum: answer y to all these questions. It will plot a trace of the spectrum; I fit a straight line to these, and the slope is usually only a couple of pixels over the whole chip, depending on how well the CCD has been put in the dewar. If there are any discrepant points, delete them with d and fit again with f; when you are happy, exit with q again.
When you fit a standard star (or other bright object), note this slope, e.g. the above slopes down 5 pixels over the length of the slit. This slope shouldn't change much from spectrum to spectrum, so if the slope for your (faint) object is very different, it means the trace has been lost. You can often just delete the bad points till the slope looks like what you're expecting; if not, you've got a lot more work to do.
apall then asks if you want to write these apertures, examine the extracted spectrum, etc.: answer y to all these, and q to exit from each plot.
apall then loops back to the next object.
This creates a spectrum for each object called file.ms.fits, where ms stands for "multi-spectrum". There are four spectra in each file: the spectrum itself, the un-skysubtracted spectrum, the sky, and the variance of the spectrum. These can be plotted using splot; for the spectrum, you want band 1.
apall s321r out=arc321r ref=s327rC recen- trace- back- intera-which tells apall to extract exactly the same pixels from the arc s321r as it extracted from s327rC, and store the result as arc321r. Do this for each arc.
Inputs for a NeAr arc: identify.par.
Mark a few lines using the m key; after marking the first two, type f to do the fit; then q to return back to the line selection screen. The program will now make guesses for the wavelength of each line you mark; check it matches your hardcopy before automatically accepting them!
You can zoom in on a particular bit by typing w for "window", then e on the lower-left and upper-right corners of the section you want to expand. w then a re-displays the whole plot.
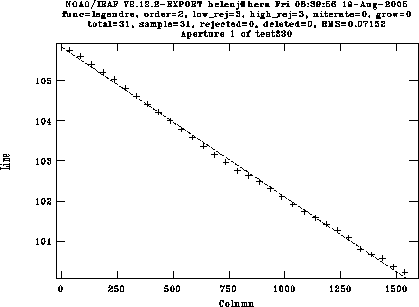
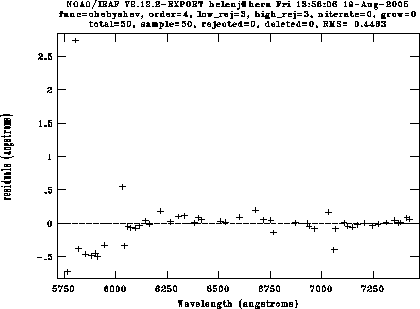
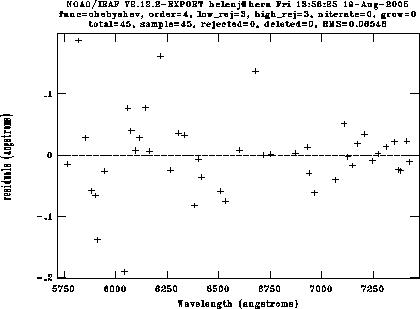
Once you have 6-10 lines identified, type l to match other lines to the list. The algorithm is reasonably good, but you'll have to delete a few spurious lines. Type f to look at the fit, then delete individual points using the d key. For the DBS red camera with a 600 line grating, I can usually get an RMS of around 0.07Å using a 4th order Chebyshev polynomial (a bit worse in the blue). Here's a fit to an arc, showing the fit immediately after the automatic fit, and then after deleting the bad points:
reidentify reference=arc321r images=arc*fits linelist=dbs_near.datThis will show you each arc in turn with the features identified. Type f to look at the fit, just as in identify; the RMS should be very similar from fit to fit. I have found that sometimes reidentify fails on arcs from the end of the night (presumably slight shifts have built up over the night), in which case you'll have to fit a new arc with identify and run reidentify on the rest of them.
refspec s*C.ms.fits referen=arc*fits sort=UTSTART group=""
Inputs: dispcor.par.
Setting global=yes ensures all spectra have the same wavelength scale, so they can be added. The corrected spectra are now called ds327rC.ms etc.
The output from dispcor shows you which arc(s) were used to calibrate the spectrum, and what the wavelength ranges are, e.g.
s339rC.ms: REFSPEC1 = 'arc336r 0.92130649'
s339rC.ms: REFSPEC2 = 'arc349r 0.078693531'
ds339rC.ms: ap = 1, w1 = 5736.239, w2 = 7474.823, dw = 1.105969, nw = 1573
sarith ds340rC.ms + ds341rC.ms night3sumR
sarith ds342rC.ms + night3sumR night3sumR clobber+
sarith ds343rC.ms + night3sumR night3sumR clobber+
Plot the result with splot; if you want to create a postscript file of your output from splot, get the screen looking the way you want it, then type
:snap epsin the graphics window. This will create a file with a name like sgi4859.eps which you can rename to something sensible.